인프런 스프링 시큐리티 강의 학습-12
인증 성공 핸들러, 인증 실패 핸들러, 인증 거부 처리를 정리한 포스트입니다.
출처는 인프런의 스프링 시큐리티 - Spring Boot 기반으로 개발하는 Spring Security강의를 바탕으로 이 포스트를 작성하고 있습니다.
강의의 세션 3의 9,10,11번 강의내용에 대한 정리입니다.
인증 성공 핸들러 - CustomAuthenticationSuccessHandler
실제 코드 및 설명
CustomAuthenticationSuccessHandler.java
@Component
public class CustomAuthenticationSuccessHandler extends SimpleUrlAuthenticationSuccessHandler {
    private final RequestCache requestCache = new HttpSessionRequestCache();                              // 1
    private final RedirectStrategy redirectStrategy = new DefaultRedirectStrategy();                      // 2

    @Override
    public void onAuthenticationSuccess(HttpServletRequest request, HttpServletResponse response, FilterChain chain, Authentication authentication) throws IOException {
        setDefaultTargetUrl("/");                                                                   // 4

        SavedRequest savedRequest = requestCache.getRequest(request, response);                     // 1

        if (savedRequest != null) {
            String targetUrl = savedRequest.getRedirectUrl();                                       // 3
            redirectStrategy.sendRedirect(request, response, targetUrl);                            // 3
        }
        else {
            redirectStrategy.sendRedirect(request, response, getDefaultTargetUrl());                // 5
        }
    }
}
사용자의 로그인 성공시 할 행동을 직접 설정합니다.
- 사용자가 로그인하기 이전에 거쳐온 요청에 관련된 정보를 담고있는 HttpSessionRequestCache를 불러와 savedRequest 객체에 저장합니다.
- 성공 작업을 완료한 후 다시 그곳으로 보내는 작업을 할 객체입니다.
- savedRequest가 null이 아니라는 이야기는 이전의 요청 정보가 있다는 것을 의미합니다. 따라서 저장된 요청 정보를 저장한 객체에서 이전 Url 정보를 꺼내고, 요청 받고, 보낼 정보와 함께 Redirect 시킵니다.
- 기본 타켓 Url을 저장시킵니다.
- savedRequest가 null이라는 의미는 홈에서 바로 로그인을 진행했다는 것을 의미하기 때문에 요청 받고, 보낼 정보와 함께 기본 타켓 Url로 이동시킵니다.
SecurityConfig.java
private AuthenticationSuccessHandler customAuthenticationSuccessHandler;

@Autowired
private void setSecurityConfig(AuthenticationDetailsSource authenticationDetailsSource, AuthenticationSuccessHandler customAuthenticationSuccessHandler) {
    this.authenticationDetailsSource = authenticationDetailsSource;
    this.customAuthenticationSuccessHandler = customAuthenticationSuccessHandler;
}

@Bean
public SecurityFilterChain filterChain(HttpSecurity http) throws Exception {
        // 이전 코드는 동일
            .and()
            .formLogin()
            .loginPage("/login")
            .loginProcessingUrl("/login_proc")
            .defaultSuccessUrl("/")
            .authenticationDetailsSource(authenticationDetailsSource)
            .successHandler(customAuthenticationSuccessHandler)         // 인증 성공 처리 작업을 진행합니다.
            .permitAll();

    return http.build();
}
성공 핸들러를 작동시키기 위한 SecurityConfig의 코드입니다. 하지만 지금 만든 SuccessHandler가 동작하지 않고, 자체적인 SuccessHandler가 동작하는 오류가 있습니다. 오류가 해결되면 이 포스트의 참조에 오류 해결을 남기도록 하겠습니다.
인증 실패 핸들러 - CustomAuthenticationFailureHandler
실제 코드 및 설명
CustomAuthenticationFailureHandler.java
@Component
public class CustomAuthenticationFailureHandler extends SimpleUrlAuthenticationFailureHandler {
    @Override
    public void onAuthenticationFailure(HttpServletRequest request, HttpServletResponse response, AuthenticationException exception) throws IOException, ServletException {
        String errorMessage = "Invalid Username or Password";

        if (exception instanceof BadCredentialsException) {                     // 1
            errorMessage = "Invalid Username or Password";
        }
        else if (exception instanceof InsufficientAuthenticationException) {    // 2
            errorMessage = "Invalid Secret Key";
        }

        setDefaultFailureUrl("/login?error=true&exception=" + errorMessage);    // 3

        super.onAuthenticationFailure(request, response, exception);            // 4
    }
}
- CustomAuthenticationProvider에서 설정했듯이 비밀번호가 다르면 BadCredentialsException 오류를 던집니다. 그럼 errorMessage를 설정합니다.
- CustomAuthenticationProvider에서 설정했듯이 secret key 정보가 다르면 InsufficientAuthenticationException 오류를 던집니다. 그럼 errorMessage를 설정합니다.
- 오류가 날때 던질 오류 Url을 설정합니다.
- 모든 설정이 끝나고, 부모 클레스에 onAuthenticationFailure 핸들러로 처리를 위임합니다.
LoginController.java
@GetMapping("/login")
public String login(@RequestParam(value = "error", required = false) String error,          // 1
                    @RequestParam(value = "exception", required = false) String exception,  // 2
                    Model model) {                                                          // 3
    model.addAttribute("error", error);                                                     // 4
    model.addAttribute("exception", exception);                                             // 4

    return "/user/login/login";
}
- 일반적인 로그인 시에는 전달되지 않는 값이기 때문에 required를 false로 두고, url에서 받은 error를 저장합니다.
- 오류와 마찬가지로 필수값이 아니기에 required를 false로 두고, url에서 받은 exception을 저장합니다.
- JSP Servlet로 웹 어플리케이션을 만들 때 보통 request나 session 내장객체에 정보를 담아 jsp에 넘겨주는데 그 역할을 Spring에서 하는게 Modle이고, model을 생성할 필요 없이 파라미터로 선언해주면 스프링이 알아서 만들어 줍니다. 출처 2번
- 정보를 프론트에 넘겨줍니다.
login.html
<!DOCTYPE html>
<html xmlns:th="http://www.thymeleaf.org">
<head th:replace="layout/header::userHead"></head>
<body>
<div th:replace="layout/top::header"></div>
<div class="container text-center">
  <div class="login-form d-flex justify-content-center">
    <div class="col-sm-5" style="margin-top: 30px;">
      <div class="panel">
        <p>아이디와 비밀번호를 입력해주세요</p>
      </div>
      <div th:if="${param.error}" class="form-group">                                                   <!--1-->
        <span th:text="${exception}" class="alert alert-danger">잘못된 아이디나 암호입니다</span>           <!--1-->
      </div>
      <form th:action="@{/login_proc}" class="form-signin" method="post">
        <input th:type="hidden" th:value="secret" name="secret_key" >
        <div class="form-group">
          <input type="text" class="form-control" name="username" placeholder="아이디" required="required" autofocus="autofocus">
        </div>
        <div class="form-group">
          <input type="password" class="form-control" name="password" placeholder="비밀번호" required="required">
        </div>
        <button type="submit" class="btn btn-lg btn-primary btn-block">로그인</button>
      </form>
    </div>
  </div>
</div>
</body>
</html>
- 파라미터에 error값이 true면 문맥을 띄우고, 그 전달 받는 exception 값을 띄웁니다.
SecurityConfig.java
private AuthenticationFailureHandler customAuthenticationFailureHandler;

@Autowired
private void setSecurityConfig(AuthenticationDetailsSource authenticationDetailsSource, AuthenticationSuccessHandler customAuthenticationSuccessHandler, AuthenticationFailureHandler customAuthenticationFailureHandler) {
    this.authenticationDetailsSource = authenticationDetailsSource;
    this.customAuthenticationSuccessHandler = customAuthenticationSuccessHandler;
    this.customAuthenticationFailureHandler = customAuthenticationFailureHandler;
}

@Bean
public SecurityFilterChain filterChain(HttpSecurity http) throws Exception {
    // 아래 코드까지의 코드는 동일합니다.
    http
            .authorizeRequests()
            .antMatchers("/", "/users", "/user/login/**", "/error", "/login**").permitAll() // 1
            .antMatchers("/mypage").hasRole("USER")
            .antMatchers("/messages").hasRole("MANAGER")
            .antMatchers("/config").hasRole("ADMIN")
            .anyRequest().authenticated()
            .and()
            .formLogin()
            .loginPage("/login")
            .loginProcessingUrl("/login_proc")
            .defaultSuccessUrl("/")
            .authenticationDetailsSource(authenticationDetailsSource)
            .successHandler(customAuthenticationSuccessHandler)
            .failureHandler(customAuthenticationFailureHandler)                             // 2
            .permitAll();

    return http.build();
}
- 핸들러에서 저장한 로그인 오류 Url 전체를 하나의 경로로 인식하기 때문에 이 경로에 대해 접근이 가능하도록 설정했습니다.
- failureHandler를 구동하도록 설정합니다. 비밀번호 잘못 입력시 정상적으로 구동하는 것을 확인했습니다. 하지만 이 테스트를 할 당시 InsufficientAuthenticationException 오류가 제대로 던져지지 않고, 로그인이 되는 에러가 있어 그 부분은 확인하지 못했습니다.
실제 실행 화면
FailureHandler의 BadCredentialsException 관련 메세지 저장 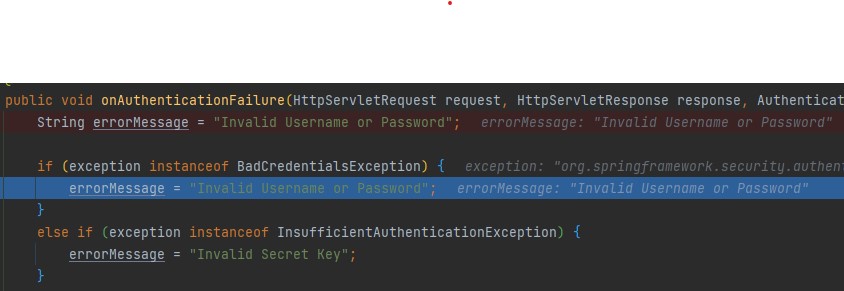
BadCredentialsException 메세지 정상 출력  FailureHandler에서 BadCredentialsException를 정상적으로 인식해 에러 메세지를 URL로 보내고 오류를 받은 프론트에서 에러 메세지를 정상 출력하는 것을 확인하실 수 있습니다.
FailureHandler의 InsufficientAuthenticationException 관련 메세지 저장 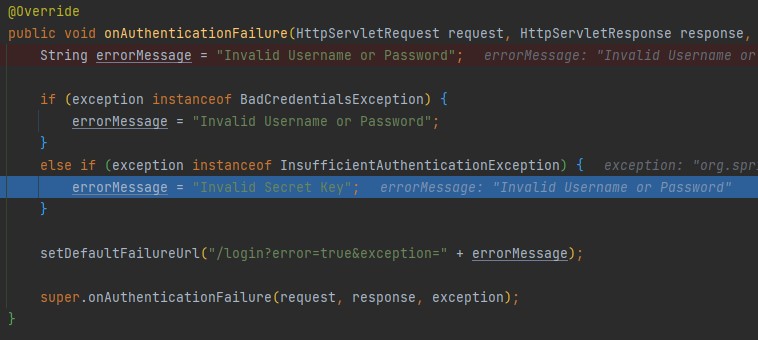
InsufficientAuthenticationException 메세지 정상 출력 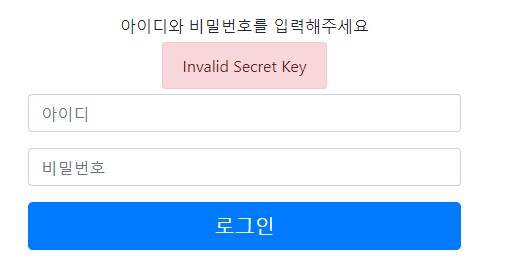 FailureHandler에서 InsufficientAuthenticationException를 정상적으로 인식해 에러 메세지를 URL로 보내고 오류를 받은 프론트에서 에러 메세지를 정상 출력하는 것을 확인하실 수 있습니다.
인증 거부 처리 - Access Denied
실제 코드 및 설명
CustomAccessDeniedHandler.java
public class CustomAccessDeniedHandler implements AccessDeniedHandler {
    public void setErrorPage(String errorPage) {
        this.errorPage = errorPage;                                                         // 2
    }

    private String errorPage;

    @Override
    public void handle(HttpServletRequest request, HttpServletResponse response, AccessDeniedException accessDeniedException) throws IOException {
        String deniedUrl = errorPage + "?exception=" + accessDeniedException.getMessage();  // 1
        response.sendRedirect(deniedUrl);
    }
}
- Denied 페이지 경로와 인가 예외 메시지를 전달할 Url을 저장합니다.
- Denied 페이지를 받을 객체입니다.
LoginController.java
@GetMapping("/denied")
public String accessDenied(@RequestParam(value = "exception", required = false) String exception,   // 1
                            Model model) {
    Authentication authentication = SecurityContextHolder.getContext().getAuthentication();         // 2
    Account account = (Account) authentication.getPrincipal();                                      // 2
    model.addAttribute("username", account.getUsername());
    model.addAttribute("exception", exception);

    return "/user/login/denied";
}
- 전달받은 exception 정보를 받아 저장합니다.
- 사용자 정보를 가져와 저장합니다.
SecurityConfig.java
private FormAuthenticationDetailsSource authenticationDetailsSource;                    // 1
private AuthenticationSuccessHandler customAuthenticationSuccessHandler;
private AuthenticationFailureHandler customAuthenticationFailureHandler;

@Autowired
private void setSecurityConfig(FormAuthenticationDetailsSource authenticationDetailsSource, AuthenticationSuccessHandler customAuthenticationSuccessHandler, AuthenticationFailureHandler customAuthenticationFailureHandler) {
    this.authenticationDetailsSource = authenticationDetailsSource;
    this.customAuthenticationSuccessHandler = customAuthenticationSuccessHandler;
    this.customAuthenticationFailureHandler = customAuthenticationFailureHandler;
}

@Bean
public AccessDeniedHandler accessDeniedHandler() {                                      // 2
    CustomAccessDeniedHandler accessDeniedHandler = new CustomAccessDeniedHandler();
    accessDeniedHandler.setErrorPage("/denied");

    return accessDeniedHandler;
}

@Bean
public SecurityFilterChain filterChain(HttpSecurity http) throws Exception {
    // 아래 까지의 코드는 동일합니다.
            .failureHandler(customAuthenticationFailureHandler)
            .permitAll()
            .and()
            .exceptionHandling()                                                        // 3
            .accessDeniedHandler(accessDeniedHandler());                                // 4

    return http.build();
}
- defaultSuccessUrl(“/”) 는
FormLoginConfigurer<HttpSecurity>가 리턴되고 있고 authenticationDetailsSources(authenticationDetailsSource) 는 FormLoginConfigurer 가 리턴되고 있습니다. 이둘의 차이는 api 가 실행되고 나서 리턴되는 객체가 HttpSecurity 타입으로 되어야 하는데 2번은 제네릭이 적용되지 않아서 최상위 인터페이스인 SecurityBuilder 타입의 객체가 리턴되고 있어 exceptionHandling이 생성되지 않아 타입을 변경했습니다. 이 해답의 출처는 강의의 exceptionHandling()을 사용할 수가 없습니다 질문입니다. - DeniedHandler로 접근 할 수 있도록 하는 빈을 설정해줍니다.
- 인가 예외 발생시 핸들러를 호출할 수 있게 해주는 API입니다.
- 제작된 핸들러가 사용할 수 있도록 해주는 API입니다.
denied.html
<!DOCTYPE html>
<html lang="ko" xmlns:th="http://www.thymeleaf.org">
<head th:replace="layout/header::userHead"></head>
<body>
<div th:replace="layout/top::header"></div>
<div class="container">
    <div class="row align-items-start">
        <nav class="col-md-2 d-none d-md-block bg-light sidebar">
            <div class="sidebar-sticky">
                <ul class="nav flex-column">
                    <li class="nav-item">
                        <div style="padding-top:10px;" class="nav flex-column nav-pills" aria-orientation="vertical">
                            <a th:href="@{/}" style="margin:5px;" class="nav-link  text-primary">대시보드</a>
                            <a th:href="@{/mypage}" style="margin:5px;" class="nav-link text-primary">마이페이지</a>
                            <a th:href="@{/messages}" style="margin:5px;" class="nav-link text-primary">메시지</a>
                            <a th:href="@{/config}" style="margin:5px;" class="nav-link text-primary">환경설정</a>
                        </div>
                    </li>
                </ul>
            </div>
        </nav>
        <div style="padding-top:50px;"  class="col">
            <div class="container text-center">
                <h1><span th:text="${username}" class="alert alert-danger" />님은 접근 권한이 없습니다.</h1>
                <br />
                <h3 th:text="${exception}"></h3>
            </div>
        </div>
    </div>
</div>
<div th:replace="layout/footer::footer"></div>
</body>
</html>
인가 예외시 뜨는 화면의 html 코드입니다. 역시 코드의 출처는 강의의 깃허브입니다.
실제 실행 화면
denied url이 정상적으로 저장됨  user 권한으로 메시지 링크로 접속하여, 인가 예외를 발생시키고, 인가 예외 url이 정상적으로 저장되는 사진입니다.
인가 예외 페이지 정상 출력 화면 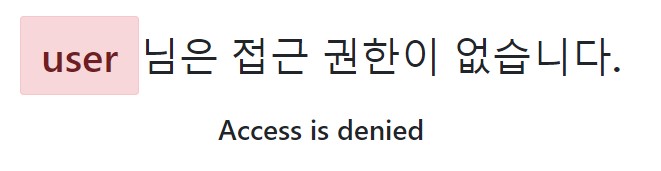 인가 예외 링크가 제대로 전달되 화면에 출력되는 사진입니다.
참고
CustomAuthenticationSuccessHandler 오류 해결
변경 전
@Component
public class CustomAuthenticationSuccessHandler extends SimpleUrlAuthenticationSuccessHandler {
    private final RequestCache requestCache = new HttpSessionRequestCache();
    private final RedirectStrategy redirectStrategy = new DefaultRedirectStrategy();

    @Override
    public void onAuthenticationSuccess(HttpServletRequest request, HttpServletResponse response, FilterChain chain, Authentication authentication) throws IOException {  // 1
        setDefaultTargetUrl("/");

        SavedRequest savedRequest = requestCache.getRequest(request, response);

        if (savedRequest != null) {
            String targetUrl = savedRequest.getRedirectUrl();
            redirectStrategy.sendRedirect(request, response, targetUrl);
        }
        else {
            redirectStrategy.sendRedirect(request, response, getDefaultTargetUrl());
        }
    }
}
변경 후
@Component
public class CustomAuthenticationSuccessHandler extends SimpleUrlAuthenticationSuccessHandler {
    private final RequestCache requestCache = new HttpSessionRequestCache();
    private final RedirectStrategy redirectStrategy = new DefaultRedirectStrategy();

    @Override
    public void onAuthenticationSuccess(HttpServletRequest request, HttpServletResponse response, Authentication authentication) throws IOException {  // 1
        setDefaultTargetUrl("/");

        SavedRequest savedRequest = requestCache.getRequest(request, response);

        if (savedRequest != null) {
            String targetUrl = savedRequest.getRedirectUrl();
            redirectStrategy.sendRedirect(request, response, targetUrl);
        }
        else {
            redirectStrategy.sendRedirect(request, response, getDefaultTargetUrl());
        }
    }
}
- Override하는 메소드가 정확하지 않아 시스템이 부모 클래스로 가 정보를 처리해 만든 핸들러가 작동하지 않았습니다.