인프런 스프링 시큐리티 강의 학습-11
로그인 페이지 생성, 로그아웃 인증, 인증 부가 기능을 정리한 포스트입니다.
출처는 인프런의 스프링 시큐리티 - Spring Boot 기반으로 개발하는 Spring Security강의를 바탕으로 이 포스트를 작성하고 있습니다.
강의의 세션 3의 6,7,8번 강의내용에 대한 정리입니다.
커스텀 로그인 페이지 생성하기
프론트 앤드 실제 코드
top.html
<!DOCTYPE html>
<html lang="ko" xmlns:th="http://www.thymeleaf.org">
<div th:fragment="header">
    <nav class="navbar navbar-dark sticky-top bg-dark ">
        <div class="container">
            <a class="text-light" href="#"><h4>Core Spring Security</h4></a>
            <ul class="nav justify-content-end">
                <li class="nav-item"><a class="nav-link text-light" th:href="@{/login}">로그인</a></li>     <!--1-->
                <li class="nav-item"><a class="nav-link text-light" th:href="@{/users}">회원가입</a></li>
                <li class="nav-item" ><a class="nav-link text-light" href="/">HOME</a></li>
            </ul>
        </div>
    </nav>
</div>
</html>
- 회원가입과 HOME만 있던 html에 로그인을 위한 경로를 추가합니다.
login.html
<!DOCTYPE html>
<html xmlns:th="http://www.thymeleaf.org">
<head th:replace="layout/header::userHead"></head>
<body>
<div th:replace="layout/top::header"></div>
<div class="container text-center">
  <div class="login-form d-flex justify-content-center">
    <div class="col-sm-5" style="margin-top: 30px;">
      <div class="panel">
        <p>아이디와 비밀번호를 입력해주세요</p>
      </div>
      <div th:if="${param.error}" class="form-group">
        <span th:text="${exception}" class="alert alert-danger">잘못된 아이디나 암호입니다</span>
      </div>
      <form th:action="@{/login_proc}" class="form-signin" method="post">                       <!--1-->
        <input type="hidden" th:value="secret" name="secret_key" />
        <div class="form-group">
          <input type="text" class="form-control" name="username" placeholder="아이디" required="required" autofocus="autofocus">
        </div>
        <div class="form-group">
          <input type="password" class="form-control" name="password" placeholder="비밀번호" required="required">
        </div>
        <button type="submit" class="btn btn-lg btn-primary btn-block">로그인</button>
      </form>
    </div>
  </div>
</div>
</body>
</html>
로그인 html의 출처는 강의의 github입니다.
- 로그인을 하기 위한 Action 경로입니다. loginProcessingUrl과 같은 값이어야 합니다.
Spring 실제 코드
SecurityConfig.java
@Bean
public SecurityFilterChain filterChain(HttpSecurity http) throws Exception {
    AuthenticationManagerBuilder authenticationManagerBuilder = http.getSharedObject(AuthenticationManagerBuilder.class);
    authenticationManagerBuilder.authenticationProvider(authenticationProvider());

    http
            .authorizeRequests()
            .antMatchers("/", "/users", "/user/login/**", "/error").permitAll() // 1
            .antMatchers("/mypage").hasRole("USER")
            .antMatchers("/messages").hasRole("MANAGER")
            .antMatchers("/config").hasRole("ADMIN")
            .anyRequest().authenticated()
            .and()
            .formLogin()
            .loginPage("/login")                                                // 2
            .loginProcessingUrl("/login_proc")                                  // 3
            .defaultSuccessUrl("/")                                             // 4
            .permitAll();                                                       // 5

    return http.build();
}
- 로그인 중
{"timestamp":"2022-01-01T20:11:13.890+00:00","status":999,"error":"None"}오류를 해결하기 위해 /error 경로를 예외처리 하였습니다.- 확인 결과 인터넷 웹 브라우저의 주소창에 표시되는 아이콘인 favicon의 에러 코드가 문제를 일으키는 것으로 예상됩니다. 출처는 출처 2번입니다.
- 로그인을 진행할 경로를 입력하여 로그인 페이지에 사용자가 접근할 수 있도록 합니다.
- 로그인 Form의 Action 경로입니다. 실제 로그인이 진행되는 메소드입니다.
- 로그인에 성공하게 되면 이동할 경로를 지정합니다.
- 위 설정으로 인해 로그인 페이지가 생성된 페이지로 이동하기 때문에 permitAll로 권한을 통과 처리를 합니다.
LoginController.java
@Controller
public class LoginController {
    @GetMapping("/login")
    public String login() {
        return "/user/login/login";
    }
}
로그인 페이지로 이동하게 하기 위해 경로와 페이지를 매핑 처리합니다.
로그아웃 및 인증에 따른 화면 보안 처리
로그아웃 인증의 설명
- 로그아웃 방법
- 인증 여부에 따른 로그인/로그아웃 표현
sec:authorize="isAnonymous()는 로그인을 하지 않았을 경우 화면에 메뉴를 띄웁니다.sec:authorize=isAuthenticated()는 로그인을 했을 경우 화면에 메뉴를 띄웁니다.
프론트 앤드 실제 코드
top.html
<!DOCTYPE html>
<html lang="ko" xmlns:th="http://www.thymeleaf.org"
                xmlns:sec="http://www.thymeleaf.org/thymeleaf-extras-springsecurity5">                                                          <!--1-->
<div th:fragment="header">
    <nav class="navbar navbar-dark sticky-top bg-dark ">
        <div class="container">
            <a class="text-light" href="#"><h4>Core Spring Security</h4></a>
            <ul class="nav justify-content-end">
                <li class="nav-item" sec:authorize="isAnonymous()"><a class="nav-link text-light" th:href="@{/login}">로그인</a></li>           <!--2-->
                <li class="nav-item" sec:authorize="isAnonymous()"><a class="nav-link text-light" th:href="@{/users}">회원가입</a></li>         <!--2-->
                <li class="nav-item" sec:authorize="isAuthenticated()"><a class="nav-link text-light" th:href="@{/logout}">로그아웃</a></li>    <!--3-->
                <li class="nav-item" ><a class="nav-link text-light" href="/">HOME</a></li>
            </ul>
        </div>
    </nav>
</div>
</html>
따로 사진 첨부는 하지 않았지만 로그인/로그아웃시 정상적으로 메뉴를 띄우는 것을 확인했습니다.
- 로그인/로그아웃 관련 스프링 시큐리티와 연결된 타임리프를 사용하기 위해 설정해야하는 namespace입니다.
- 로그인을 하지 않았을 경우 로그인과 회원가입을 화면에 띄웁니다.
- 로그인을 했을 경우 로그아웃을 화면에 띄웁니다.
Spring 실제 코드
LoginController.java
@GetMapping("/logout")
public String logout(HttpServletRequest request, HttpServletResponse response) {
    Authentication authentication = SecurityContextHolder.getContext().getAuthentication(); // 1

    if (authentication != null) {
        new SecurityContextLogoutHandler().logout(request, response, authentication);       // 2
    }

    return "redirect:/";
}
따로 사진 첨부는 안했지만 로그아웃이 정상적으로 작동하는 것을 확인했습니다.
- 로그아웃을 한다는 의미는 이미 로그인을 했다는 것을 의미하기에 SecurityContext안에 인증 객체가 담겨 있다는 것을 의미합니다. 그래서 인증객체를 가져와 authentication에 저장합니다.
- 로그인을 진행하는 핸들러를 불러와 실제 로그아웃 처리를 진행합니다.
인증 부가 기능 - WebAuthenticationDetails, AuthenticationDetailsSource
클레스 설명 및 로그인 순서도
- WebAuthenticationDetails
- 1번 과정(인증 과정) 중 전달된 데이터를 저장해 인증 과정 속에서 활용하거나 인증 이후에 계속적으로 정보들을 참조해 어떤 처리를 할 때 사용할 수 있게 하는 클레스입니다,
- AuthenticationDetailsSource
- WebAuthenticationDetails 객체를 생성하는 클레스입니다.
다음은 로그인 처리 순서입니다.
- 사용자가 Username과 passoword 정보를 입력해 로그인을 요청하면 AuthenticationFilter가 요청을 처리합니다. 하지만 사용자가 이 정보 이외의 추가적인 파라미터를 정의해 데이터를 전달 한다고 가정하겠습니다.
- 인증 필터가 인증을 처리하면 가장 먼저 인증 객체를 생성합니다. 인증 객체에는 ID와 PW가 저장이 됩니다. 그리고 인증 객체는 내부적으로 details라는 object 타입의 속성을 가지고 있습니다.
- details라는 속성을 가지고 있고, details 안에는 AuthenticationDetailsSource가 생성한 WebAuthenticationDetails라는 클레스 객체가 저장되어 있습니다.
- details는 object 타입이기 때문에 어떤 타입의 정보라도 담을 수 있습니다.
- 사용자가 추가적으로 전달한 파라미터들을 얻어 클레스에 저장하는 역할을 합니다.
- remoteAddress와 SessionId는 스프링 시큐리티가 처리를 하고, 추가 파라미터들은 Details에게 전달되는 request 객체를 사용해
request.getParameter("")형식으로 추가적으로 전달되는 파라미터를 저장합니다.
- remoteAddress와 SessionId는 스프링 시큐리티가 처리를 하고, 추가 파라미터들은 Details에게 전달되는 request 객체를 사용해
실제 코드
FormWebAuthenticationDetails.java
public class FormWebAuthenticationDetails extends WebAuthenticationDetails {
    private final String secretKey;

    public FormWebAuthenticationDetails(HttpServletRequest request) {
        super(request);
        secretKey = request.getParameter("secret_key");                     // 1
    }

    public String getSecretKey() {
        return secretKey;                                                   // 1
    }
}
사용자가 전달하는 ID와 PW외에 추가적인 파라미터들을 저장하는 클레스입니다.
- 전달받은 데이터 중에서 추가적인 정보인 secret_key를 저장하는 클레스입니다.
FormAuthenticationDetailsSource.java
@Component                  // 1
public class FormAuthenticationDetailsSource implements AuthenticationDetailsSource<HttpServletRequest, WebAuthenticationDetails> {
    @Override
    public WebAuthenticationDetails buildDetails(HttpServletRequest context) {
        return new FormWebAuthenticationDetails(context);
    }
}
FormWebAuthenticationDetails 클레스를 생성하는 클레스입니다.
- 설정 클레스에서 추가를 해야하기 때문에 빈으로 등록하였습니다.
SecurityConfig.java
private AuthenticationDetailsSource authenticationDetailsSource;

@Autowired
private void setSecurityConfig(AuthenticationDetailsSource authenticationDetailsSource) {
    this.authenticationDetailsSource = authenticationDetailsSource;
}

@Bean
public SecurityFilterChain filterChain(HttpSecurity http) throws Exception {
    AuthenticationManagerBuilder authenticationManagerBuilder = http.getSharedObject(AuthenticationManagerBuilder.class);
    authenticationManagerBuilder.authenticationProvider(authenticationProvider());

    http
            // 전 코드와 동일
            .and()
            .formLogin()
            .loginPage("/login")
            .loginProcessingUrl("/login_proc")
            .authenticationDetailsSource(authenticationDetailsSource)       // 1
            .defaultSuccessUrl("/")
            .permitAll();

    return http.build();
}
- 만든 2개의 클레스를 사용하도록 설정하였습니다.
login.html
<form th:action="@{/login_proc}" class="form-signin" method="post">
    <input th:type="hidden" th:value="secret" name="secret_key" >        <!--1-->
    <div class="form-group">
        <input type="text" class="form-control" name="username" placeholder="아이디" required="required" autofocus="autofocus">
    </div>
    <div class="form-group">
        <input type="password" class="form-control" name="password" placeholder="비밀번호" required="required">
    </div>
    <button type="submit" class="btn btn-lg btn-primary btn-block">로그인</button>
    </form>
- 추가적인 파라미터인 secret 키를 로그인시 전달해 백앤드에서 전달받을 수 있도록 해줍니다.
FormAuthenticationProvider.java
@Override
@Transactional
public Authentication authenticate(Authentication authentication) throws AuthenticationException {
    String username = authentication.getName();
    String password = (String) authentication.getCredentials();

    AccountContext accountContext = (AccountContext)userDetailsService.loadUserByUsername(username);

    if (!passwordEncoder.matches(password, accountContext.getAccount().getPassword())) {
        throw new BadCredentialsException("BadCredentialsException");
    }

    FormWebAuthenticationDetails formWebAuthenticationDetails = (FormWebAuthenticationDetails) authentication.getDetails();     // 1
    String secretKey = formWebAuthenticationDetails.getSecretKey();                                                             // 2
    if (!"secret".equals(secretKey)) {                                                                                          // 3
        throw new InsufficientAuthenticationException("InsufficientAuthenticationException");                                   // 4
    }

    return new UsernamePasswordAuthenticationToken(accountContext.getAccount(), null, accountContext.getAuthorities());
}
- ID, PW외 파라미터를 저장하는 formWebAuthenticationDetails 형태로 인증 객체에게 Details 객체를 받습니다
- 저장된 객체 중 SecretKey를 꺼내 저장합니다.
- 불러온 secretKey와 전달받아야 하는 키를 비교합니다.
- 만약 secret가 다르다면 오류를 던집니다.
오류발생
secretKey가 같다면 정상적으로 오류를 던지지 않고, 이동하지만 secretKey가 다르면 FormAuthenticationProvider.java의 주석 4번의 오류를 정상적으로 던지지만 오류 처리가 되지 않고, 로그인이 정상적으로 되는 오류가 확인되었습니다.
 FormAuthenticationProvider 클레스 주석 1번에 BreakPoint를 걸고 진행사항을 확인한 것입니다. 정상적으로 오류가 던져지는 것을 확인할 수 있습니다.
 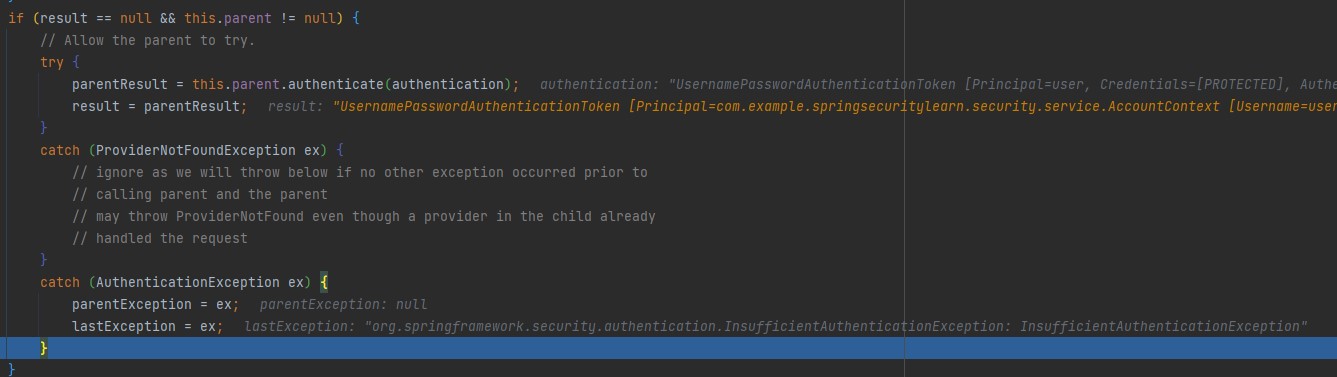 구현 클레스가 아닌 스프링 시큐리티 authentication 패키지의 providermanager 클레스입니다.
보시면 원래 result에 null이 저장이 되야하지만 result에 값이 저장되고, parentException이 null이고, lastException만 값이 저장되있는 것을 확인할 수 있습니다.
그래서 throw lastException로 넘어가지 않고, if (result != null) 조건에 걸려 이후 절차를 수행하는 것을 확인했습니다. 그 후 정상적으로 로그인이 됩니다. 이 오류에 관해 해결하지 못해, 일단 세션 3의 남은 강의들을 진행하면서 오류를 지속적으로 고쳐보도록 하겠습니다.
참고
InsufficientAuthenticationException의 오류 해결
우선 이 코드 문제를 해결해주신 강좌 강사님께 감사드립니다.
이전 버전에서는 CustomAuthenticationProvider 를 만들게 되면 ProviderManager 의 parent 속성에 DaoAuthenticationProvider 가 생성되지 않은 것으로 알고 있는데 지금은 내부 로직이 약간 달라져서 parent 속성에 DaoAuthenticationProvider 가 생성되는 바람에 CustomAuthenticationProvider 에서 예외를 던지더라도 ProviderManager 에서 예외를 잡기는 하지만 parent 속성에 있는 DaoAuthenticationProvider 를 다시 호출해서 인증처리를 하고 있습니다.
실제 parent의 providers 속성의 DaoAuthenticationProvider 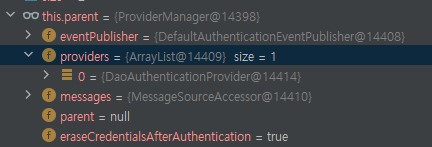
DaoAuthenticationProvider 는 아이디와 패스워드만 일치하면 인증처리가 되기 때문에 CustomAuthenticationProvider 의 결과에 상관없이 인증이 성공하게 됩니다.
변경 전 SecurityConfig.java
private AuthenticationDetailsSource authenticationDetailsSource;

@Autowired
private void setSecurityConfig(AuthenticationDetailsSource authenticationDetailsSource) {
    this.authenticationDetailsSource = authenticationDetailsSource;
}

@Bean
public SecurityFilterChain filterChain(HttpSecurity http) throws Exception {
    AuthenticationManagerBuilder authenticationManagerBuilder = http.getSharedObject(AuthenticationManagerBuilder.class);
    authenticationManagerBuilder.authenticationProvider(authenticationProvider());      // 1

    http
            // 전 코드와 동일
            .and()
            .formLogin()
            .loginPage("/login")
            .loginProcessingUrl("/login_proc")
            .authenticationDetailsSource(authenticationDetailsSource)
            .defaultSuccessUrl("/")
            .permitAll();

    return http.build();
}
변경 후 SecurityConfig.java
private AuthenticationDetailsSource authenticationDetailsSource;

@Autowired
private void setSecurityConfig(AuthenticationDetailsSource authenticationDetailsSource) {
    this.authenticationDetailsSource = authenticationDetailsSource;
}

@Bean
public SecurityFilterChain filterChain(HttpSecurity http) throws Exception {
    AuthenticationManagerBuilder authenticationManagerBuilder = http.getSharedObject(AuthenticationManagerBuilder.class);
    authenticationManagerBuilder.authenticationProvider(authenticationProvider());
    authenticationManagerBuilder.parentAuthenticationManager(null);                     // 1

    http
            // 전 코드와 동일
            .and()
            .formLogin()
            .loginPage("/login")
            .loginProcessingUrl("/login_proc")
            .authenticationDetailsSource(authenticationDetailsSource)
            .defaultSuccessUrl("/")
            .permitAll();

    return http.build();
}
- ProviderManager 의 parent 속성을 제거해서 DaoAuthenticationProvider 가 다시 실행하지 않도록 합니다.
코드 변경 전 예외 진행
Transactional 어노테이션으로 인해 진행되는 과정을 제외하고, ProviderManager의 진행 위주로 설명하겠습니다.
- 먼저 CustomAuthenticationProvider가 던진 예외를 ProviderManager의
catch (AuthenticationException ex)가 잡습니다. - 그렇게 예외가 lastException으로 진행하고 나면, AuthenticationProvider provider : getProviders() 반복을 진행하다가 빠져나오게 됩니다.
- 그 후
result == null && this.parent != null조건문에서 result 값도 없고, parent는 활성화되있기 때문에 둘 다 true가 되 if문으로 진입하게 됩니다. - try ~ catch 문으로 진입하는데 그
parentResult = this.parent.authenticate(authentication);문에서 parent가 가지고 있는 DaoAuthenticationProvider로 로그인을 다시 시도합니다. - 비밀번호와 아이디만 가지고 로그인을 진행하기 때문에 로그인이 완료되고, result의 값도 채워지게됩니다.
- 다음 result != null 조건문에서 result가 저장되었기 때문에 true가 되 result 값을 UsernamePasswordAuthenticationFilter 클래스의
return this.getAuthenticationManager().authenticate(authRequest);문에 넘기게 됩니다. - 그 후에는 정상적인 로그인 문이 진행되며 로그인이 완료되게 됩니다.
코드 변경 후 예외 진행
- 위 변경 전 예외 진행과 1, 2번은 똫같이 진행됩니다.
- 하지만 이번에는 parent속성을 SecurityConfig 에서 parent속성을 null로 설정했기 때문에
result == null && this.parent != null조건문에서 this.parent 값이 null이라 false가 나와 조건문에 진입하지 않습니다. - 그렇게 result != null 조건문과 lastException == null 조건문이 false가 나오고, throw lastException를 통해 정상적으로 오류가 던져지게 됩니다.
이 오류는 저를 힘들게 했지만 덕분에 코드에 BreakPoint를 걸어 오류가 발생했을 때 Breakpoint를 통해 코드의 진행을 명확히 파악하는 방식을 알게 되어 좋은 공부가 되었습니다.